Install PICkit 2 Development Programmer / Debugger on Raspberry Pi OS.

To install PICkit 2 Development Programmer / Debugger on Raspberry Pi OS, we are gonna first prepare our system by installing dependencies, download source code for PICkit 2 command-line application, compile it, and at the end verify test installation.

So for that, we are gonna use these commands as follows:

Update and Install dependencies:

sudo apt update
sudo apt install build-essential libusb-dev

Download and unpack the source files:

wget https://ww1.microchip.com/downloads/en/DeviceDoc/pk2cmdv1.20LinuxMacSource.tar.gz
tar xzvf pk2cmdv1.20LinuxMacSource.tar.gz
cd pk2cmdv1.20LinuxMacSource

Building the application:

make linux

Installing the application:

make install

Adding device file location to PATH:

echo 'export PATH="$PATH:/usr/share/pk2"' >> ~/.bashrc

Reboot system and test installation:

pk2cmd -?v

# PICki2 not connected
Executable Version:    1.20.00
Device File Version:   1.55.00
OS Firmware Version:   PICkit 2 not found

# PICkit2 connected
Executable Version:    1.20.00
Device File Version:   1.55.00
OS Firmware Version:   2.32.00

Uninstall pk2cmd:

Remove file pk2cmd from /usr/local/bin:
sudo rm -R /usr/local/bin/pk2cmd

Remove all files from /usr/share/pk2/:
sudo rm /usr/share/pk2/*

Remove folder /usr/share/pk2/:
sudo rm -R /usr/share/pk2

Edit file .bashrc:
sudo nano ~/.bashrc

Find and Remove line :
export PATH="$PATH:/usr/share/pk2"

Stay healthy and safe till the next time!
Raspberry Pi 4 Native USB Boot

It has finally arrived, unfortunately in beta but it still works, RPi 4 Native USB Boot. Say goodby to micro SD. I have been using RPi 4 for about four months or a little more, as a personal computer and I am mostly satisfied. Settings “boot” partition on micro SD card and “root” partition on
SD disk, works without any problems. But recently it has been possible to set up RPi 4 to boot directly from a USB drive!
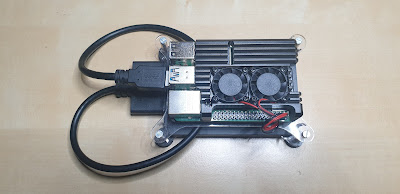
My RPi 4 Setup (RPi 4, 4GB, Samsung SSD 250GB, USB to S-ATA adapter, sertronic RPI4-ARC-FA case with cooler)

First I found a video on Youtube and tried to make it and I failed. Then an article came out on the portal, so I followed the instructions and again I failed. 
Opsss! What is happening? 
I used NOOBS for OS instead of Raspbian (oooo noooo). So I came to the conclusion that Native USB Boot does not work on NOOBS.
The following is a step-by-step guide on how to set up RPi 4 for Native USB Boot, or to Boot without micro SD.
So let’s get started:
  1. make a fresh copy of micro SD with Raspbian OS (Raspbian Imager, works on Windows, Linux and macOS)
  2. insert micro SD into RPi4 and power on
  3. install OS
  4. update OS:
    • sudo apt update
    • sudo apt full-upgrade
    • sudo rpi-update
  5. reboot RPi
  6. edit rpi-eeprom-update:
    • sudo nano /etc/default/rpi-eeprom-update
    • FIRMWARE_RELEASE_STATUS value from “critical” to “beta”
  7. update firmware:
    • sudo rpi-eeprom-update -d -f /lib/firmware/raspberrypi/bootloader/beta/pieeprom-2020-05-15.bin
  8. reboot RPi
  9. check firmware version:
    • vcgencmd bootloader_version
  10. clone micro SD to USB Drive (SD Card Copier)
  11. shutdown RPi
  12. remove micro SD
  13. power on RPi
And that should be it, now we have an RPi with an SSD that is significantly faster than a micro SD. Lots of fun and I hope this step by step guide is helpful.
Until next time, Thanks for visiting!