// *********************************************************
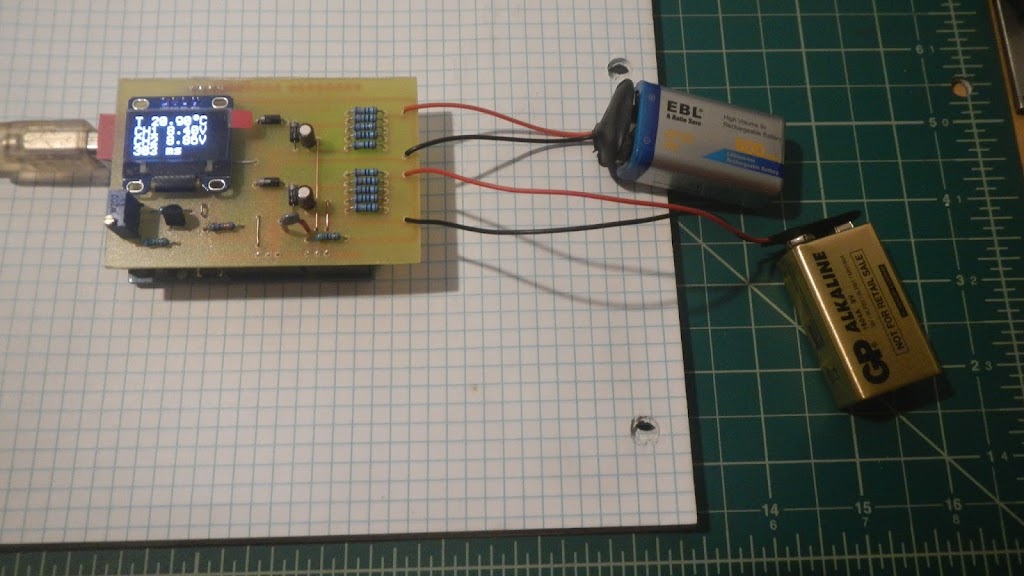
// Program:   two chanel voltmeter with thermometer
// Date:      01/09/2018
// Version:   1.0
// Author:    Elvis Baketa
// Description:
// *********************************************************

#include <Arduino.h>
#include <Wire.h>
#include <U8g2lib.h>

// WHITE OLED LCD 0.96" 128X64 I2C
U8G2_SSD1306_128X64_NONAME_F_HW_I2C u8g2(U8G2_R0, /* reset=*/ U8X8_PIN_NONE);

unsigned long startTime;
unsigned long finishTime;

int updateDisplay = 0;
int samples = 16;
float resolution = 4096.0;
float voltageReference = 4.096;
float seriesResistor = 47000.00;

int analogValueCH0[16];
int analogValueCH1[16];
int analogValueCH2[16];
unsigned int averageAnalogValueCH0;
unsigned int averageAnalogValueCH1;
unsigned int averageAnalogValueCH2;
float voltageCH0 = 0.000;
float voltageCH1 = 0.000;
float voltageCH2 = 0.000;
float averageVoltageCH1 = 0.000;
float averageVoltageCH2 = 0.000;

float resistance = 0.000;
float temperature = 0.000;
float averageTemperature = 0.000;

void setup() {
  // put your setup code here, to run once:
  analogReference(EXTERNAL);
  u8g2.begin();
}

void loop() {
  // put your main code here, to run repeatedly:
  updateDisplay++;

  // read chanel one
  for(int i = 0; i < samples; i++) {
    analogValueCH0[i] = analogRead(A0);
    delay(1);
  }
  for(int l = 0; l < samples; l++) {
    averageAnalogValueCH0 += analogValueCH0[l];
  }
  averageAnalogValueCH0 /= 4;
  voltageCH0 = averageAnalogValueCH0 * (voltageReference / resolution);
  averageAnalogValueCH0 = 0;
  // convert volts to resistance
  resistance = voltageReference / voltageCH0 - 1;
  resistance = 1 / resistance;
  resistance = seriesResistor * resistance;
  // convert resistance to temperature in Kelvin
  temperature = log(resistance / seriesResistor);
  temperature = temperature * (1 / float(3435));
  temperature = temperature + (1 / (25 + 273.15));
  temperature = 1 / temperature;
  // convert Kelvin to Celsius
  // T(°C) = T(°K) - 273.15
  temperature = temperature - 273.15;
  averageTemperature += temperature;

  // read chanel two
  for(int j = 0; j < samples; j++) {
    analogValueCH1[j] = analogRead(A1);
    delay(1);
  }
  for(int m = 0; m < samples; m++) {
    averageAnalogValueCH1 += analogValueCH1[m];
  }
  averageAnalogValueCH1 /= 4;
  voltageCH1 = averageAnalogValueCH1 * (voltageReference / resolution);
  voltageCH1 *= 10;
  averageVoltageCH1 += voltageCH1;
  averageAnalogValueCH1 = 0;

  // read chanel three
  for(int k = 0; k < samples; k++) {
    analogValueCH2[k] = analogRead(A2);
    delay(1);
  }
  for(int n = 0; n < samples; n++) {
    averageAnalogValueCH2 += analogValueCH2[n];
  }
  averageAnalogValueCH2 /= 4;
  voltageCH2 = averageAnalogValueCH2 * (voltageReference / resolution);
  voltageCH2 *= 10;
  averageVoltageCH2 += voltageCH2;
  averageAnalogValueCH2 = 0;

  if(updateDisplay > 4) {
    // display data
    u8g2.clearBuffer();
    u8g2.setFont(u8g2_font_profont22_tf);
    averageTemperature /= updateDisplay;
    u8g2.setCursor(0, 16);
    u8g2.print("T ");
    u8g2.print(averageTemperature);
    u8g2.print(char(176));
    u8g2.print("C");
    averageVoltageCH1 /= updateDisplay;
    u8g2.setCursor(0, 32);
    u8g2.print("CH1 ");
    u8g2.print(averageVoltageCH1);
    u8g2.print("V");
    averageVoltageCH2 /= updateDisplay;
    u8g2.setCursor(0, 48);
    u8g2.print("CH2 ");
    u8g2.print(averageVoltageCH2);
    u8g2.print("V");
    u8g2.setCursor(0, 64);
    finishTime = millis() - startTime;
    u8g2.print(finishTime);
    u8g2.print(" ms");
    u8g2.sendBuffer();
    averageTemperature = 0.000;
    averageVoltageCH1 = 0.000;
    averageVoltageCH2 = 0.000;
    updateDisplay = 0;
    startTime = millis();
  }
}
Arduino
Send IR commands with Arduino
Sending IR commands from the Arduino is quite simple. It is necessary to connect the IR LED on a specific Arduino pin and write a program to send IR commands. In this example, I connected the IR LED on the Arduino digital pin 2 and wrote a simple sketch to send IR commands by NEC protocol.
Sending commands is very simple, all you need to do is call the function “sendCode (94, 248)”. The first number is the address of the device in this case YAMAHA AV receiver and the second number is the command in this case POWER.
More information about NEC protocol can be found at: SB-Projects: IR Remote Control NEC protocol.
// *********************************************************
// Program: NEC PROTOCOL INFRARED REMOTE SENDER
// Version: 1.0
// Author: Elvis Baketa
// Description:
// *********************************************************

// definitions of constants
#define pulseTime 560         // duration of carrier pulse
#define irLed 2               // ir led connected to digital pin 2
#define YAMAHA 94             // device address byte
#define STANDBY 248           // device command byte

// standard Arduino setup routine
void setup()
{
  pinMode(irLed, OUTPUT);     // set irled pin as output
  digitalWrite(irLed, LOW);   // turn of ir led

  // send test command to turn on/off yamaha av receiver
  sendCode(YAMAHA, STANDBY);
}

// standard Arduino loop routine
void loop()
{
}

// routines to create a carrier pulse
void carrierPulse(unsigned int duration)
{
  for(int i=0; i < (duration / 35); i++)
    {
      digitalWrite(irLed, HIGH);   // set irled to high
      delayMicroseconds(13);       // duration of high pulse
      digitalWrite(irLed, LOW);    // set irled to low
      delayMicroseconds(13);       // duration of low pulse
    }
}

// routines for sending code
void sendCode(byte addressByte, byte commandByte)
{
  // preparing the code for sending
  unsigned long code = 0;

  code = addressByte;
  code = code << 8;
  code = code | addressByte ^ 0xFF;
  code = code << 8;
  code = code | commandByte;
  code = code << 8;
  code = code | commandByte ^ 0xFF;

  // start sending code
  // send AGC pulse approximate to 9ms
  carrierPulse(16 * pulseTime);

  // space pulse approximate to 4.5ms
  delayMicroseconds(8 * pulseTime);

  // send bits one by one, MSB first
  for (int i=31; i>=0; i--)
    {
      if (bitRead(code, i))
      {
        carrierPulse(pulseTime);
        delayMicroseconds(3 * pulseTime);
      }else{
        carrierPulse(pulseTime);
        delayMicroseconds(pulseTime);
      }
    }

    // send stop bit
    carrierPulse(pulseTime);
}
Initialize VFD display using Arduino
In this article I will describe how to initialize display from a faulty DVD player. DVD player, VCR and other consumer electronics use vacuum fluorescent display (VFD) for displaying different information and we can can control it using Arduino or any other microcontroller. Most of us electronics technician in our workshops have a faulty device from which we can make use of valid parts for new projects and devices.
From a faulty DVD player I took VFD display and a power source. I used the power source to power the VFD display and Arduino.
VFD display module which I took from a faulty DVD player uses PT6312 controller, for which I found on the internet datasheet. According the datasheet PT6312 is a controller for a vacuum fluorescent display (VFD) packaged in a 44 pin plastic housing. PT6312 is functionally compatible with the μPD16312. To communicate with the Arduino I used DAT, CLK and STB lines from module and connect on Arduino digital pins 2, 3 and 4.
// *********************************************************
// Program:  VFD display control (PT6312)
// Version:  1.0
// Author:  Elvis Baketa
// Description:
// *********************************************************

#define DAT 2
#define CLK 3
#define STB 4

#define displayMode 0x01         // 5 digits, 16 segments
#define dataSettings 0x40        // Data write & read mode settings
#define incrementAddress 0x40    // Increment address after data has been written
#define fixedAddress 0x44        // Fixed address
#define addressSettings 0xC0     // Address settings command
#define startAddress 0x00        // start address of ram memory
#define endAddress 0x09          // end address of ram memory
#define displayControl 0x8F      // Display settings ON/OFF

// standard Arduino setup routine
void setup()
{
  // initialize vfd display
  initDisplay();
  // send some data to display
  updateFixedAddress(startAddress, 0b01110111);
}

// standard Arduino loop routine
void loop()
{
}

// routines for sending commands
void sendCommand(unsigned int command, boolean data)
{
  digitalWrite(CLK, HIGH);
  digitalWrite(STB, LOW);

  for(int i = 0; i < 8; i++)
  {
    if(bitRead(command, i) & 0x01)
    {
      digitalWrite(DAT, HIGH);
    }else{
      digitalWrite(DAT, LOW);
    }
    digitalWrite(CLK, LOW);
    digitalWrite(CLK, HIGH);
  }

  if(data) digitalWrite(STB, HIGH);
}

// routines for sending data
void sendData(unsigned int data, boolean last)
{
  for(int i = 0; i < 8; i++)
  {
    if(bitRead(data, i) & 0x01)
    {
      digitalWrite(DAT, HIGH);
    }else{
      digitalWrite(DAT, LOW);
    }
    digitalWrite(CLK, LOW);
    digitalWrite(CLK, HIGH);
  }

  if(last) digitalWrite(STB, HIGH);
}

// routines for set ram address
void setAddress(unsigned int address, boolean data)
{
  sendCommand(addressSettings | (address & 0x1F), data);
}

// routine cleaning of display memory
void clearDisplay()
{
  sendCommand(incrementAddress, true);
  setAddress(startAddress, false);
  for(int i = 0; i <= endAddress; i++)
  {
    sendData(0x00, false);
  }
  digitalWrite(STB, HIGH);
}

// routines for initialize display
void initDisplay()
{
  delay (200);

  // define communication pins
  pinMode(DAT, OUTPUT);
  pinMode(CLK, OUTPUT);
  pinMode(STB, OUTPUT);

  // clear display ram memory
  clearDisplay();

  // set display mode to 5 digits, 16 segments
  sendCommand(displayMode, true);
  // set display on and maximum dimming
  sendCommand(displayControl, true);
}

// routine to update fixed memory addresses
void updateFixedAddress(int address, int data)
{
  sendCommand(fixedAddress, true);
  setAddress(address, false);
  sendData(data, true);
}


